Process: Create New Assets from GIS Data
Introduction
The Geographic Information System (GIS) of an organisation may be the initial source of information about a new asset, particularly the spatial definition of the asset.
Asset attributes may be first created in the GIS as part of the asset creation workflow, particularly if a developer or other organisation has created the asset and is providing the 'as-constructed' assets in spatial format with asset attributes.
Since Assetic is able to record the spatial definition of an asset a process can be setup to keep Assetic up to date with new asset information when it is created in the GIS.
The spatial location information simplifies locating the asset within mapping applications such as Google Maps and it also enables Assetic to provide advanced spatial operations such as searching for assets within radius of a point. The source of the spatial location data is usually from the GIS used within the organisation.
There are 2 options for creating the asset and spatial definition in Assetic:
- Bulk import via Data Exchange
- Per asset creation via Assetic REST API's
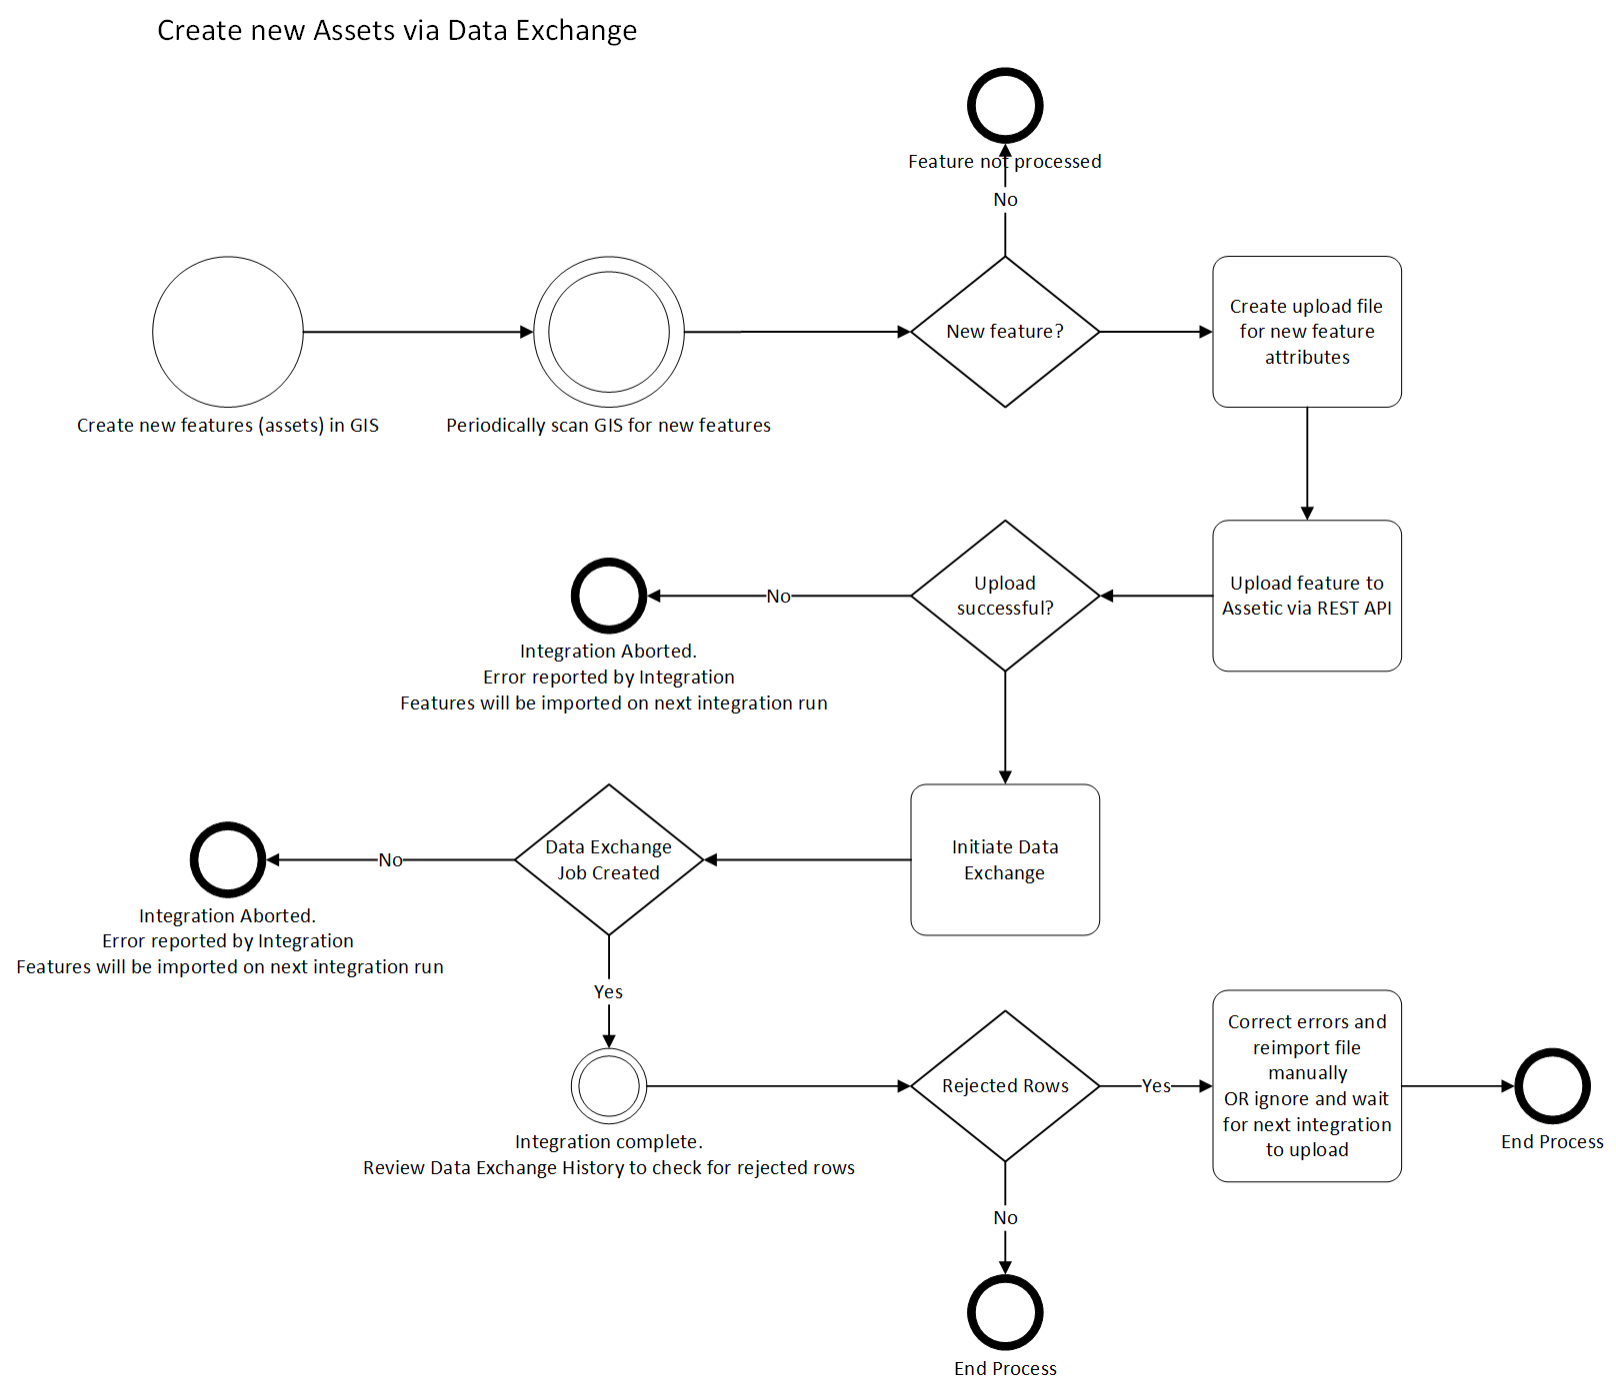
Data Exchange
This process utilizes Data Exchange to upload new assets in bulk. The file format used by Data Exchange is CSV.
The advantages to using Data Exchange are:
- Management of the timing of the upload to optimise system performance
- Handles a large number of records
- Provides upload history
- Provides an error file of records that did not load along with reason for upload failure. These records can be corrected and re-submitted
- Is disconnected from the GIS data capture, so in the event that Assetic is unavailable or response times are poor the GIS data capture is able to continue
- Allows the upload file to be created by the user to match an upload template created by the user. This simplifies integration configuration.
The alternate option is to create assets one by one via the Assetic asset creation API.
The typical workflow is:
Assetic REST API's
The Assetic REST API's may be used to create the new asset on a per asset basis.
The first step is to create the asset and it's attributes via the Assetic REST API POST /api/v2/assets. Refer to the article Create Assets and associated records for further detail on this API.
Once the asset has been created the spatial definition of the asset may be set using the Assetic REST API PUT /api/v2/assets/{id}/location. Refer to the article Create or Update Asset Spatial Data for further detail on this API.
Accessing GIS Data
The following table outlines for common GIS software how the data may be extracted and prepared for upload. In all cases it is expected that the data extract filters out features (assets) that have been flagged as already successfully uploaded to Assetic. The extract will contain only those features that do not have a corresponding asset in Assetic
The number of features extracted per file should also be restricted so that the size of the upload file is not too large.
| GIS Data Type | Process |
| ESRI shp |
1. Manual data extraction process. The CSV file may be prepared via a ArcGIS desktop query and export tools. The file would be saved in a location that the integration process scans and processes 2. Automated data extraction process. A python script would be executed from within ArcGIS desktop to filter and extract the data. This script would perform the entire integration. |
| ESRI Geodatabase |
1. Manual data extraction process. The CSV file may be prepared via a ArcGIS desktop query and export tools. The file would be saved in a location that the integration process scans and processes 2. Automated data extraction process. A python script would be executed which connects to the database and uses a query to extract the data. This script would perform the entire integration, and does not require ArcGIS desktop |
| FME |
1. Use FME to extract data to a CSV file. The file would be saved in a location that the integration process scans and processes 2. Use FME to extract the data and also perform the integration by executing a script |
| Open Spatial |
Automated data extraction process. A python script would be executed which connects to the database and uses a query to extract the data. This script would perform the entire integration, and does not require ArcGIS desktop |
|
MapInfo Spatial database |
Automated data extraction process. A python script would be executed which connects to the database and uses a query to extract the data. This script would perform the entire integration, and does not require ArcGIS desktop |
|
Spatial database (Oracle, SQL Server, mySQL) |
Automated data extraction process. A python script would be executed which connects to the database and uses a query to extract the data. This script would perform the entire integration, and does not require ArcGIS desktop |
